
Having a Chlorophytum comosum plant, commonly referred to as a Spider plant, in your home is an ongoing breath of fresh air. Literally, this eye-catching companion is a wonderful air-purifying plant. It will reward you with a healthy environment for the efforts you put in while caring for it.
Now, there is a plethora of benefits associated with decorating your home with Spider plants. Starting with how gorgeous its green or variegated foliage can be, its low-maintenance nature and its adaptability, and of course, we shouldn’t forget about the fact that it can be easily propagated.
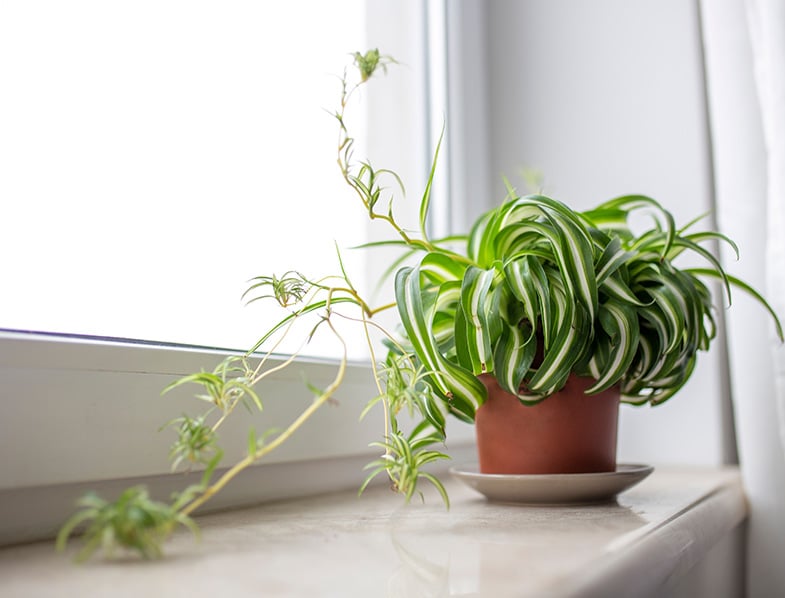
If you are the owner of at least one Spider plant, you already know that this buddy can thrive only with indirect light, well-draining soil, and moderate watering. When you manage to meet these basic demands, the Spider plant will be more likely to send off stolons.
They are roots that show up above the soil that produce babies of your Spider plant called spiderettes. The stolons are a great propagation material and you will find out more about them in little to no time.
The spiderettes will be your go-to cuttings in the propagation process. There are three popular ways in which you can propagate your Spider plant. They are all easy to get through and, if you have kids, you can ask them to join the party and have fun while making more Spider plants.
Besides stolons and spiderettes, you can also propagate your Spider plant using seeds. Of course, you do not have to go to markets or garden shops to look for seeds. If you are lucky enough, your Spider plant may produce seeds for you to use in propagation.
All you have to do is check your plant from time to time and, if you notice seeds where flowers were, use your excitement to make more Spider plant beauties.
By the end of our Spider plant propagation guide, you will have all the skills you need to activate your inner gardener and try at least one of these propagation methods at home. The good news: it does not even matter if you are a beginner! Keep reading to find out everything you need to know about propagating your Spider plant successfully!

- Elegant Variegation: Enjoy the unique beauty of the Airplane variety, with its distinctive white and green striped leaves that add a stylish touch to your home or office decor.
- Easy to Grow: Perfect for both novice and experienced plant enthusiasts, the Variegated Spider Plant thrives in a range of indoor conditions and requires minimal maintenance.
- Air-Purifying Qualities: This plant helps improve indoor air quality by filtering out toxins, creating a healthier living environment.
- Trailing Growth: Watch as the spiderettes gracefully cascade from the main plant, creating a lush, trailing effect that enhances the beauty of any space.
- Shipping: Your plant will be securely packaged to ensure safe delivery to your doorstep, preserving its good condition.

- PRODUCT: Includes 2 variegated Spider Plants in 4-inch grower nursery pots. Plant height may vary but they are rooted and grow quickly.
- GROWING ZONES: 9, 10, 11 or Indoor Houseplant. Colder zones can bring it outdoors from late spring to early fall with warm temperatures.
- LOW-MAINTENANCE: Spider plants are exceptionally easy to grow, requiring little more than bright indirect light and moderate to low moisture. They're also air purifiers.
- BRAND: Easy to Grow is an American company that partners with farmers and growers. Locally grown houseplants.

- 🌿 Triple the Greenery: Live Spider Plants, also known as Airplane Plants, perfect for enhancing the aesthetic appeal of your home or office. Their striking white and green striped foliage adds a touch of nature's elegance to any indoor space.
- 🍃 Air Purification Excellence: Renowned for their air-purifying capabilities, these Spider Plants effectively filter and clean indoor air by removing harmful pollutants like formaldehyde and xylene, contributing to a healthier living environment.
- 🪴 Versatile Decor Addition: Ideal for various indoor settings, these plants thrive in bright, indirect light. Whether placed in hanging baskets, pots, or as part of a decorative arrangement, they bring vibrant energy and freshness to any decor style.
- 🌱 Low Maintenance Houseplants: Perfect for both novice and experienced gardeners, these Spider Plants require minimal care. They thrive with routine watering and basic light conditions, making them an easy and rewarding choice for busy individuals.
- 🎁 Thoughtful and Practical Gift: This Spider Plant trio makes a thoughtful and practical gift for anyone who loves plants or could benefit from improved air quality. It’s an ideal present for housewarmings, birthdays, or any special occasion.
Last update on 2025-11-16 / Affiliate links / Images from Amazon Product Advertising API
Propagating Spider Plant Through Cuttings
Whether you want to propagate your Spider plants from cuttings in water or directly into the soil, there are several steps at first that are the same. Before getting into action, you will have to equip yourself with a tool to take the cuttings.
This ideal utensil can be a really sharp knife, but you can also use flower snippers or clippers to get the job done. Once you have your desired tool, it is wise to wipe the blade clean using alcohol to prevent any fungal issues to appear on the cuttings or the parent Spider plant.
Keep in mind that this is not a propagation method using leaf cuttings. The cuts you will be doing are for the spiderettes, which basically behave like offsets of other plants that might be more common to you. You can do this only when your Spider plant has sent at least one spiderette from its stolon.
First things first, look for the stolon of the mother plant and remove the spiderettes carefully from it. You should cut right along the base of each spiderette without worrying about cutting parts of the stolon. You can also remove it with the stolon, but we recommend you leave it in place on the mother plant to produce more spiderettes with time.
From now on, things get slightly different. The spiderettes you just cut must go in two separate directions, depending on which method you opt for. You can choose to root the cuttings in water for a while, then plant them in the soil once some roots develop. Another way of doing it, however, would be to plant the cuttings directly in the soil and wait for the magic to happen there. Let’s see together what all of this is about!
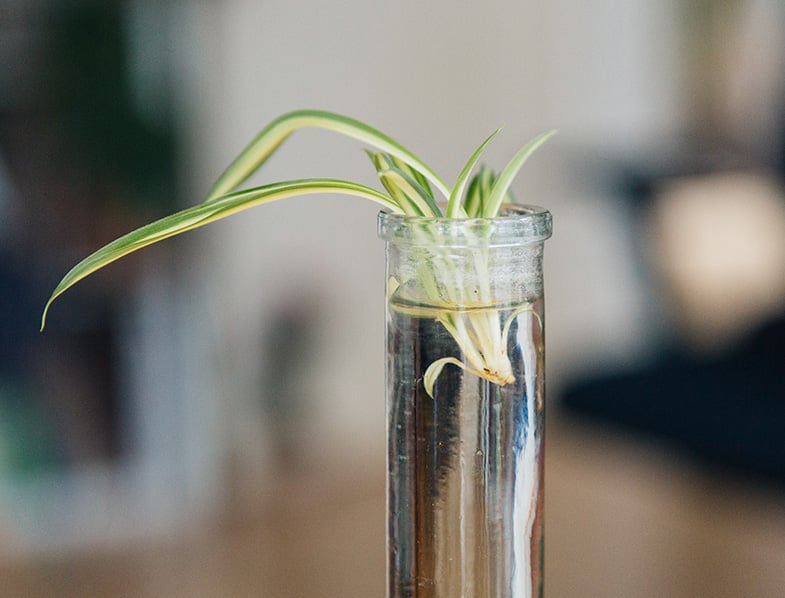
1. Propagating Spider Plants In Water
Get a clear container and clean it to remove the possibility of an unhealthy environment for your Spider plant cuttings. Most gardeners usually use a jar, but you can go for any container that suits your preferences as long as it meets the requirements mentioned above.
Once you decide, fill the container with water and let it sit for an hour or so to allow the water to reach room temperature and dechlorinate. If you have more than one cutting, you will need a container for each extra cutting. Repeat the cleaning and water-related process for each cutting.
Place the new Spider plant cuttings into their individual containers. The water should cover the very bottom of the spiderettes without letting any leaves touch the water. Move the containers to a location where the spiderettes can receive lots of bright and indirect light. Whenever the water gets cloudy, this is a common indicator for you to change it with fresh moisture.
After several weeks or so, you should see some roots showing up but you cannot go to the next step just yet. In general, it is best to remove the Spider plant cuttings from the water when each has a generous grouping of roots. At that very moment, you can start preparing the growing medium for your new plants.
Take a pot for each spiderette you have and fill them with soilless seed starting mix. Make sure you plant them in pots that feature drainage holes at the bottom. You can even add some perlite to the potting mix to improve the overall drainage.
Make a hole in a substrate that is big enough for each spiderette to shelter its young roots. Plant the spiderettes in their individual containers, cover the roots with soil, and then water the starting mix until it becomes damp but not soaked.
Since direct sunlight can kill new, tender Spider plants, you will need to place the spiderettes in a warm, indirect-lit area. Give your young Spider plants some space, as they will require a bit of time to settle in their new home.
If you want to check on them once in a while, you can lightly tug on the spiderettes and, in case you feel some kind of resistance, your plants have established and also taken root. Now you can treat them as Spider plant grown-ups!
2. Propagating Spider Plants In Soil
This method is much easier than using water because it skips all the rooting-in-water parts and goes directly to the planting step. By using this technique, however, it typically takes more time for the spiderettes to produce and establish roots.
Luckily, you can find some spiderettes that already come along with roots hanging from the mother plant. Those offshoots are most likely to give you instant feedback and we suggest you use them in this process. If you cannot find spiderettes on your Spider plant that has roots attached, you can use those but do not forget your patience on the way.

Take your Spider plant cuttings and plant them individually in their pots filled with soilless seed starting mix. You can use a pencil or a finger to make a shallow hole that is wide and deep enough for each cutting to dig its bottom part in.
In case you have cuttings with roots on them, plant them so only the roots are under the substrate. After all of this, you can cover the cuttings’ base with soil, then moisten it. Place the pots in a warm spot where the spiderettes can experience plenty of indirect light.
For optimal growth, we have a very nice trick you can use before planting your Spider plant cuttings. You can dip the cut ends of each spiderette in rooting hormone to help it develop roots much faster. Remember to do this after you take the cuttings and follow the package instructions accordingly.
Propagating Spider Plant Using Stolons
Since we have already used stolons for the first two propagation methods, we know this might be a bit confusing. But bear with us! If you decide to use this particular method, you can understand better what would happen with your Spider plant in nature.
Generally, this fellow would show up with new stolons covered in soil. With time, the spiderettes would root and the stolon would break, resulting in the plant propagating asexually.
Propagating your Spider plant directly from stolons is the most efficient when it comes to time and effort. You will not need any tools at all to do it and you can make all of this happen in the pot of the mother plant, and then transplant the new buddy later. Still, if you want, you can do this in another one from the very beginning. The choice is yours!
We mentioned just now that spiderettes will send off tiny roots. Well, these tiny roots are the source of life in this process and will help you do it smoothly.
Make a hole that is perfectly fit for the roots of your spiderette. If you want to use the pot of your parent Spider plant, you can take those tiny roots and plant them in that soil. If not, you will need to fill a new pot with soilless seed starting mix and place it right next to the mother plant.
No matter what you opt for, the mother Spider plant will continue to take care of the spiderette during its rooting process. Thanks to this, all you must do from now on is keep the rooting mix constantly moist without waterlogging it. When the spiderette enchants you with new growth, you can go on and cut the new friend from the mother plant and voilà! You have two separate Spider plants in the blink of an eye.
Starting Spider Plants From Seed
Although this is usually a rare event, the Spider plant can produce seeds. If your plant has blessed you with this miracle, you can take the opportunity to use the seeds in propagation.
You can look for seeds along those stems on which your Spider plant has exhibited small, white flowers. Collect the seeds while you can, then start this exciting adventure of growing your own Spider plants from seed.
Take a shallow pot and fill it with soilless seed starting mix. Sow the Spider plant seeds just above the substrate without covering them too much with it. For germination to occur, the seeds require lots of indirect light and warm temperatures of about 70 F (C). You should also pay attention to moisture, as a constantly slightly damp growing medium is the ideal option.

When the seedlings show up and seem to grow at their own pace, you can start fertilizing them. Make sure you feed the Spider plant seedlings with a balanced fertilizer designed for houseplants once every month. It is best to dilute the product at ¼ strength before giving it to your baby Spider plants. Regular applications will boost the growth of the seedlings.
Once the seedlings are big enough to handle, you can transplant each into its individual pot. This is the time when you can start treating each seedling as an independent Spider plant, so you should provide it with the same caring routine as that for the mother plant.
When you transplant the baby plants, you must fill the containers with a suitable potting mix (usually the one you use for the parent Spider plant) and water it well to give the plants a nice start.
How to Care for Your Spider Plants After Propagation
Spider plants will usually thrive indoors, but in warm climates, you can grow yours outdoors as well. Their ideal growth environment includes well-drained soil, light shade, bright indirect light, and generous watering, especially during their active growth period. It’s best to keep the soil of your Spider plants moderately and evenly moist, but not soggy.
The ideal temperatures for these plants range between 55°F and 70°F (13°C and 21°C). Overfertilization is a common problem for these plants, as they do not require a lot of feeding. Spider plants don’t really tend to run short on nutrients as their tubers will store plenty of nutrients.
When environmental conditions are not perfect, Spider plants will react by developing brown tips and yellow foliage. In this situation, check the soil, the lighting conditions, and the temperatures, and adjust as needed.
You can learn more about growing and caring for these ornamentals from our complete guide to Spider plants.
In Conclusion
Chlorophytum comosum a.k.a. Spider plants are among the most adaptable and easy-to-grow ornamental houseplants. These ornamentals can adapt to a wide range of environmental conditions and are not affected by many pests and diseases.
You can find different varieties on the market, and all are very attractive. Some Spider plants have green foliage, others are variegated, but regardless of the type of Spider plant that you choose to grow, the propagation method will be just as easy.
Spider plants are a delight to have around, providing spectacular views, clean air, and long-lasting friendships with minimal effort on your part. Their easy-going, irresistible style comprises even their ability to propagate easily, giving us the chance to make our plant family bigger without taking much time for it.
Propagating your Spider plant is a kid-friendly activity. And the best part: you and your kids can bond while doing this together, develop a new skill, and also have the chance of learning a bit of science along the way. And if you or your kids have special plant-loving people in your life, you can make more Spider plants to surprise them with a lovely gift.
Have you tried propagating your Spider plants? Share your experience in the comments!